
How to Query a Database in Python—PyderPuffGirls Episode 2
In PyderPuffGirl Episode 1, I showed you how to open a SQL query in Python. How can I submit said query through Python to a database? Moreover, how can I get the result of the query as a file in Python?
Goal
In this episode, I will show you how to submit a SQL script and save the results to files.
This is what I think a typical query workflow looks like:
- Put the query into a proprietary SQL software
- Press a button to run the query
- Wait indefinitely
- Get the result back, with the option of saving it as a file.
I will show you how to skip 1-3 and go directly to 4 in Python. Well, I still need to wait indefinitely, but the general steps are:
- read the SQL script into Python
- connect to database and run the script
- save the result as a .csv file in a specific path

Although I’m demonstrating on Windows 10, I added steps for Mac and Linux too. If you are a Mac user, please let me know if you find something missing.
I. Let’s install Python packages
Must
You will need to install two Python packages to follow the tutorial:
pandassqlalchemy
To install, run
pip install --user pandas sqlalchemy
in a command line tool like cmd in Windows or Terminal in Mac.
Optional—depends on the database
You also need to install the corresponding database plugin. In this example, I used PostgreSQL, so the Python package is
psycopg2
I will put the list of drivers I know at the bottom of this page.
If you figured out the correct package and steps for a database that I did not list, please contribute in the comments—with database name and versions specified—and I will update the list with proper credits.
II. Setting the username and password in environment variable
Before connecting to a database, let’s set my database username and password as environment variables. If you are interested, you can read more about what they are in here.
Wait, why do I want to use environment variables?
Unless I want to type my username and password for every query, they have to live somewhere on the computer. So, I have several options:
Option 1. Just put my password inside the Python script
I’ve put my password into the script, then forgotten about it and pushed my passwords to a central code repository before. That means I can see my password on a public webpage. Oof.
💩👎 Please learn from my blunder and don’t do this.
Fun exercise: If you can search through the content a central code repository, try searching for “password” or “pw” and see what shows up.
Option 2. Put my password in an environment variable
Anything that is in a user’s environment variables can only be accessed by the said user (me) and the admin. Therefore, the only way to access my database username and password is to get hold of the login password to the computer or the server first. It’s safer.
😊👍 This is the preferred option.
Editing environment variable for user account should not pop a local admin rights warning. If you work a corporate job and somehow this option is blocked by IT, then maybe Option 3 is the way to go.
Option 3. Putting my password in a separate configuration file
As long as the config file does not go to the central code repository I think this is ok. Setting environment variables, however, means that we don’t need to put the path of the config file into our code. Managing file path is boring, so I’d rather not deal with it.
How to set environment variables
The example I use here is PostgreSQL. For that, I am going to call my username and password environment variables PSQL_USERNAME and PSQL_PASSWORD. You can call them whatever you want. The naming convention for environment variables is all capitalized letters with no space.
For example, let’s say my
- username is
chang, and - password is
CreativePassword
On Windows
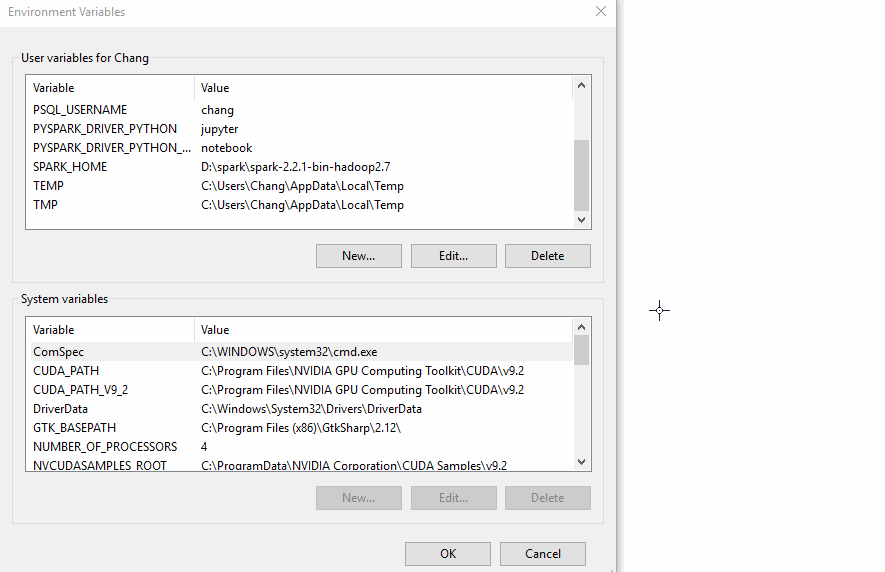
On Windows 10, type edit environment variable in the search bar. Click “Edit environment variables for your account.”
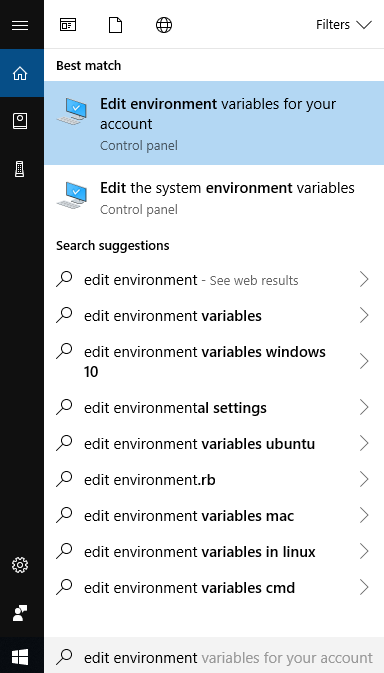
Then, in the popup window, click New... and put in the variable name and value.
Remember to press OK at the bottom of the popup window “Environment Variables” to save!
The steps for Windows 7 are slightly different from 10. This page might help. If you can’t access that site, use this one.
On Mac or on Linux or on remote Unix server
Go to the user home directory and look for the file .bash_profile. To add a environment variable in Unix, I can modify .bash_profile by adding commands with the general pattern of
export [name_of_variable]=[new_value]
So in this case, I can open .bash_profile with a text editor, add two lines
export PSQL_USERNAME=chang
export PSQL_PASSWORD=CreativePassword
and save the file. After saving, run the following command in terminal to refresh the environment variables:
source ~/.bash_profile
Putting those two lines in .bash_profile means the environment variables will load each time I log into this user account.
III. Connect to a database and run queries
Example: connecting to a PostgreSQL database
Here is the code that I’m going to explain in this section.
import os
import pandas as pd
from pathlib import Path
from sqlalchemy import create_engine

username = os.environ['PSQL_USERNAME']
password = os.environ['PSQL_PASSWORD']

engine = create_engine(f'''postgresql+psycopg2://{username}:{password}@localhost:5432/mydb''')

query = '''
select *
from weather
'''

df = pd.read_sql_query(query, engine)
df.to_csv('weather.csv', index=False)
df.to_csv(Path('c:/users/chang/documents/weather.csv'), index=False)
In this example, I am going to use a local (on my computer) PostgreSQL database mydb with only one table weather of two rows. If you are using a different database at work, then you need to figure out the connection string by yourself.
Driver and connection URL
Before I can start, I need to get two things—
- Driver
- Connection URL
that are specific to the database at hand.
This is why I had to install the Python package psycopg2. It serves as the database driver and SQLAlchemy does not know how to connect to my PostgreSQL database without it.
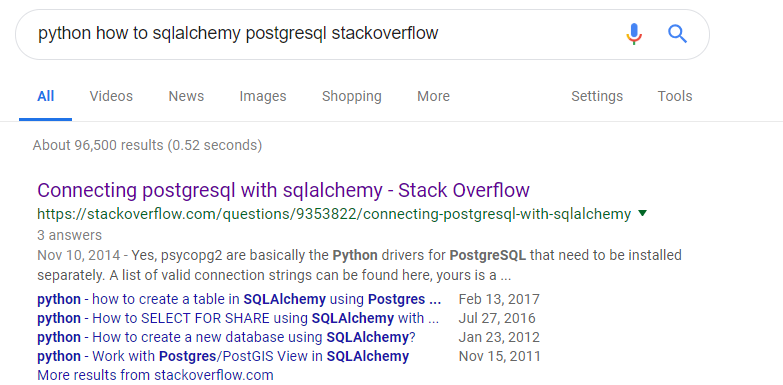
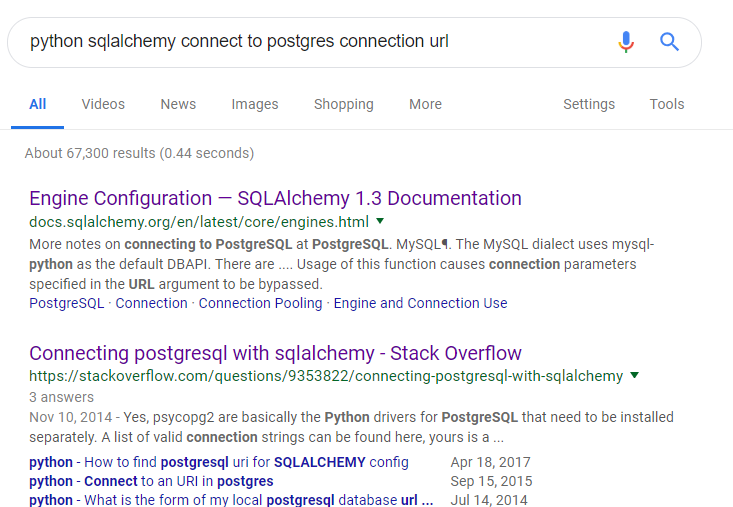
The best way to figure out which driver and connection URL to use is…Google. Most of the time, I’d google something like
How to connect to Redshift with sqlalchemy
and replace Redshift with whatever database you are working with. You can also try googling
How to connect to [databasename] python
Python driver for [databasename]
...etc
Most of the time, the correct connection URL can also be found in the proprietary SQL tool that you use to query a database. The driver is trickier, and I don’t have a good method other than googling.
If you have trouble finding the right driver and connection URL for work in less than 30 minutes, talk to the DBA. They are the expert. Don’t spend too much time on this when it’s one ask away!
1. Figure out which driver to use
This is how I found the PostgreSQL plugin for sqlalchemy
Turns out the first answer in StackOverflow was what I needed—it tells me to install the psycopg2 package from pip. So, I can install through command line by running
pip install --user psycopg2
This one wasn’t too bad, but there were times when I couldn’t find the correct drivers to use after several hours. I should have known better and asked the DBAs or data engineers.
Note: SQLAlchemy uses an ODBC connection. I intentionally leave out JDBC connection in the post because I think it will be better to put JDBC into another supplemental post. Here is a quick Explain Like I’m 5 post from Reddit about ODBC and JDBC.
2. Figure out the right connection URL
Again, I resorted to googling. I searched for
Inside the first link, it showed me an example where the general connection URL looked like
dialect+driver://username:password@host:port/database
For PostgreSQL, I can use a connection URL like
engine = create_engine('postgresql+psycopg2://scott:tiger@localhost/mydatabase')
Now I just need to figure out the right hostname and port. Again, the fastest way to find out about those at work is to talk to a DBA or a data engineer.
In this case, because I’m using a local version of PostgreSQL that uses port 5432, I can use the following connection URL:
engine = create_engine(f'''postgresql+psycopg2://{username}:{password}@localhost:5432/mydb''')
(The f-prefix means it is a Python 3.6 format string. Please refer to Episode 1.)
Th database settings part ends here. I can finally start connecting.
3. Connect to the database with username and password
The username and password are still missing in the f-string:
engine = create_engine(f'''postgresql+psycopg2://{username}:{password}@localhost:5432/mydb''')
So the next step is getting my username and password from the environment variable. The Python module os comes in handy.
import os

username = os.environ['PSQL_USERNAME']
password = os.environ['PSQL_PASSWORD']
By giving os.environ the name of an environment variable (passed into the square brackets as string), os.environ returns the corresponding value we set before into username and password, which are then substituted into the f-string.
You will see more examples like this later where I “passing a string to get a value back.” In this aspect, os.environ resembles a Python data type dict— the dictionary. This kind of relationship is often called a key-value pair.
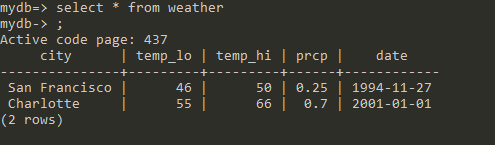
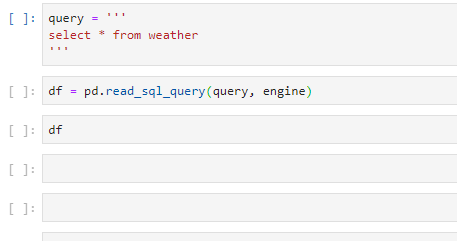
4. Write a SQL query, submit, and return a pandas dataframe
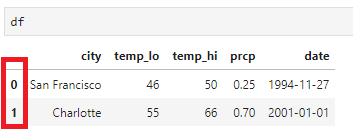
Let’s use a super simple query to demonstrate. The table I’m going to pull is called weather with only two rows, and I’m selecting all of them:
query = '''
select *
from weather
'''
Then, I can use the read_sql_query function of pandas to submit the query through the sqlalchemy engine defined earlier.
import pandas as pd
df = pd.read_sql_query(query, engine)
import pandas as pdmeans we are usingpdas an alias ofpandas. This kind of abbreviation is quite common for Python modules.- Once imported as
pd, the linepd.read_sql_querytells Python to useread_sql_queryfrom the modulepd=pandas.
Running df prints out
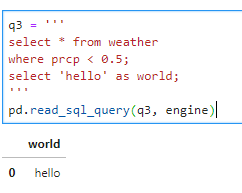
What if I submit multiple queries separated by semicolons?
If I run
q3 = '''
select * from weather
where prcp < 0.5;
select 'hello' as world;
'''
pd.read_sql_query(q3, engine)
Then it only returns and prints out the final query.
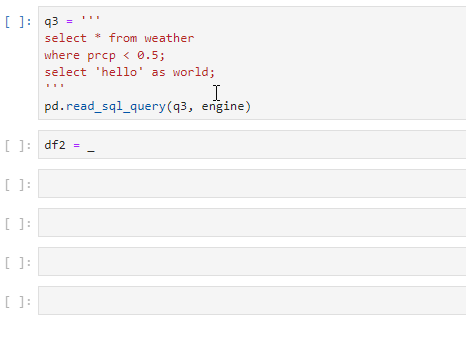
Note that because I didn’t assign the return value of read_sql_query to a variable, it prints the result to screen as a pandas dataframe:
Here’s a small trick that only works in Jupyter notebook. In Jupyter notebook, what is last printed to the screen is actually saved to a variable with the name of a single underscore _. So if I forget to assign a variable name for a long-running job, I still have a chance to save it. This doesn’t work in a normal Python script though, and please don’t use it in production jobs.
5. Save the dataframe as a .csv
Finally, Ie will save the result as a csv. Because I load the query result into a pandas dataframe, I can use the dataframe method .to_csv() to save the result to file.
# path 1, relative path
df.to_csv('weather.csv', index=False)

# path 2, absolute path
from pathlib import Path
df.to_csv(Path('c:/users/chang/documents/weather.csv'), index=False)
There are two ways to tell Python where the file is:
-
relative path: Path 1,
weather.csv, uses the relative path from the current working directory. To find out what the current working directory is, I can run the following code:import os os.getcwd()It says the current working directory is
D:\\pyderpuffgirls\\lesson2, the folder where I put my notebook in. I will talk more about relative paths later when I go into Python scripts. -
absolute path: in Windows, if the path starts with the drive name like
c:ord:, and in Mac/Linux, if the path starts with/like/usr/chang/file/some_file.csv, then they are absolute paths.This means
to_csv()will save the file to the place I specified, independent of what the current working directory is.
What about that index=False thing? By default, to_csv() will also save the index of the dataframe as its own column
which I don’t need.
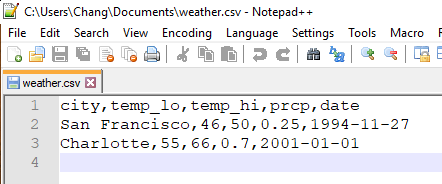
Here’s what the .csv file I saved looks like in Notepad++:
Bonus: Write dataframe back to the database
(Jared Cline suggested adding this section to make the post complete. Thanks Jared!)
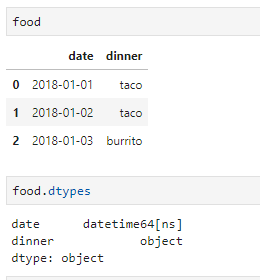
Other than writing the result to a file, sometime I want to load the dataframe back to a custom table in the database. In this case, I can use the .to_sql() method. Let’s say I have a dataframe called food,
food = pd.DataFrame({
    'date': ['2018-01-01', '2018-01-02', '2018-01-03'],
    'dinner': ['taco', 'taco', 'burrito']
})
food['date'] = pd.to_datetime(food['date'])  # change the data type from string to datetime
then I can load it into my PostgreSQL database by
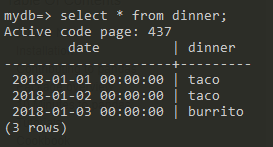
food.to_sql('dinner', engine, if_exists='replace', index=False)
which will save the dataframe as a table called dinner.
You can find the options for .to_sql() in the pandas documentation.
Bonus: Replacing query by a SQL script file
In Episode 1, I show how to read a file into Python as a string. This means that if I have a file called weather-query.sql, then I can replace the part where it says
query = '''
select *
from weather
'''
by reading in the file
with open('weather-query.sql') as file:
    query = file.read()
before I submit the query.
Summary
Let’s look at the code again:
import os
import pandas as pd
from pathlib import Path

username = os.environ['PSQL_USERNAME']
password = os.environ['PSQL_PASSWORD']

engine = create_engine(f'''postgresql+psycopg2://{username}:{password}@localhost:5432/mydb''')

query = '''
select *
from weather
'''

df = pd.read_sql_query(query, engine)
df.to_csv('weather.csv', index=False)
df.to_csv(Path('c:/users/chang/documents/weather.csv'), index=False)
Now you know how to
- Read the SQL script into Python
- Connect to database and run the script
- Save the result as a .csv file in a specific path
I’d like to think that this workflow highlights a common pattern about developing Python scripts: there are many packages out there that can do stuff for you. In particular, I used
sqlalchemy—that let me connect to the Postgres database, andpsycopg2—that provided the driver tosqlalchemy, andpandas—that let me run a query throughsqlalchemyand save to file.
What’s next?
I didn’t realize how long this post was going to be when I started. But we are here!
So far, I have been using Jupyter notebooks to run my code. In the next post, I will talk about what is a Python script and how to schedule a Python script. It is fine to run code in Jupyter notebooks, but I tend to use them only as scratch pads.
Putting Python code into scripts has several benefits:
- They are easier to work with version control—Jupyter is horrible for this
- They have better logging
- They are better for packaging and distributing
- I can unlock the power of an IDE—like PyCharm—when editing. Always unlock the swag.
But I won’t cover all the benefits yet. There are still two annoying pieces that I need to automate away: scheduling and emailing.
Appendix A: some common errors
When you see an error—
- Take a deep breath.
- Don’t panic.
- Scroll to the bottom.
ModuleNotFoundError
This often means I don’t have the correct driver installed. For example, if I run a MySQL URL,
connect_string = f'''mysql://{username}:{password}@localhost:5432/mydb'''
engine = create_engine(connect_string)
then Python complains:

Scrolling to the bottom, the error message tells me that a package MySQLdb is missing:

Googling “pip sqlalchemy mysqldb” and the first StackOverflow answer tells me that I should go look for the packaged called PyMySQL and install it with pip.
Most of the time, I’m like WTF this error message is not helpful—why does the error message give me a module name that is different from the actual package name? It is what it is 🙄.
OperationalError
This usually means there was something wrong in my connection URL.
Cause: wrong hostname or port
When I run
connect_string = f'''postgresql+psycopg2://{username}:{password}@localhost:5678/mydb'''
engine = create_engine(connect_string)
query = '''
select * from weather
'''
df = pd.read_sql_query(query, engine)
It throws an OperationalError when it gets to read_sql_query:
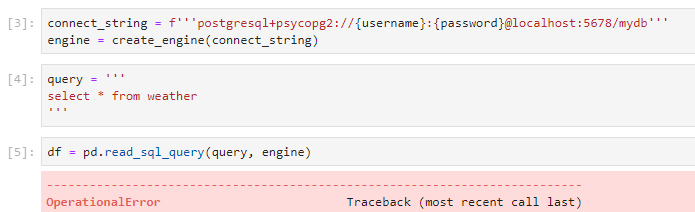
Scrolling to the bottom shows

The error shows up because the port I’m running the local Postgres on is 5432, but my connection URL says 5678.
Cause: wrong password
This is what happens when I put in the wrong password:

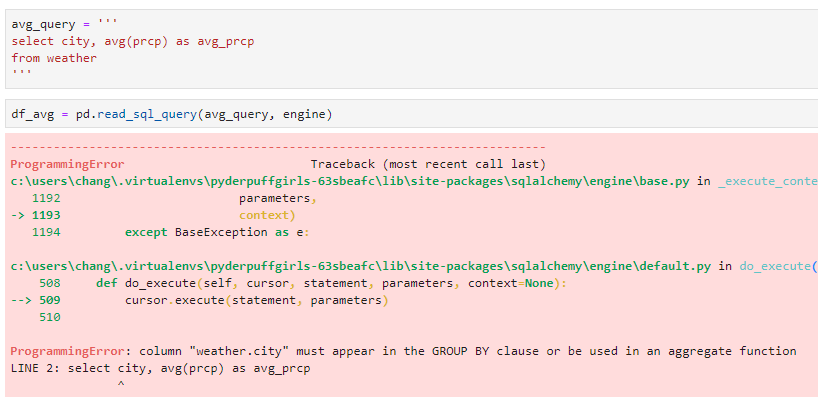
ProgrammingError
One reason for a ProgrammingError is an invalid query. For example, This is what happens when I forget to add the group by clause when I’m taking the mean of a column:
avg_query = '''
select city, avg(prcp) as avg_prcp
from weather
'''
df_avg = pd.read_sql_query(avg_query, engine)
It throws a ProgrammingError and tells me I should add city to the group by clause i.e. group by city;. I believe the error message you see in ProgrammingError are not universal and depends on the database.
Appendix B: about pip
Making sure pip works
this section is a work in progress.
If you are on Windows, it’s possible your python and pip command won’t work after installing Python. I am going to dump most of the installation into a master post later.
Always google before install
Always google pip [package name] before installing a Python package via pip. The name of package on GitHub may not be the same name used on PyPI (the pip repository) when you install. The correct name is the one on the PyPI page.
There are incidents of criminals putting impersonating package names in PyPI, so they can plant malware via pip install typos. As long as you check before installing, however, pip is safe to use.
For example, SQLAlchemy has
- A PyPI page: https://pypi.org/project/SQLAlchemy/
- A project homepage: https://www.sqlalchemy.org/
so it’s legit. Install with pip install SQLAlchemy (not case sensitive) according to the PyPI page.
Appendix C: connection driver and URLs
Please help by making this list complete. If you can let me know what works for you in the comments, then I can update this list.
PostgreSQL
- Driver: psycopg2
- Connection URL:
postgresql+psycopg2://{username}:{password}@{hostname}/{databasename}The example was found here.
Teradata
-
Teradatasqlalchemy (Official)
Not sure if you can specify the database or not.
- Driver: Teradatasqlalchemy
- Connection URL:
teradatasql://{username}:{password}@{hostname}
-
SQLAlchemy-Teradata (Unofficial)
This driver is pre-release, but it works.
- Driver: sqlalchemy-teradata
- Connection URL:
teradata://{username}:{password}@{hostname}
The PyderPuffGirls
- Episode 1: A Python Tutorial for the Bored Me
- Episode 2: How to Query a Database in Python
- Episode 3: Don’t Wait, Schedule and Relax Instead
Please feel free to post in the comments section or tweet at @ChangLeeTW for questions or comments.