
How to Make an Internal Python Package
A guide on writing your first Python package.
What do you need to make a Python package?
I have been asked this question many times, so let’s write it down.
In this tutorial, I will show you
- How to make a Python package
- How to structure the project
- How to install from remote repository
when you are looking to host it for internal use.
If you are looking to build a package on the public PyPI, I recommend using flit instead and save all the trouble:
- https://github.com/takluyver/flit
0. The idea and requirements behind a Package

What is a Python package? I think the idea of packaged code indicates 3 things:
- The code in the package is meant to be together based on utility, concept, etc.
- Once installed, I can import code in the package anywhere.
- It has a version so I know what “upgrade” means.
What you need
Following the line of thought, you need
- Python 3.3+ with
pipandvenv. Bothpipandvenvshould come by default with Python unless you are on Debian Linux. - A version control repository like BitBucket, GitHub, or GitLab to host your package source code.
What you don’t need
You don’t need an internal PyPI server to host the packages for pip install. This is nice to have but unnecessary.
1. How to make a Python package
There are only 3 things you need in order to make a Python package
- A project folder
- A
setup.py - A
__init__.py
That’s it.
Let’s break it down with an example.
Making a package lunch_options
In this post, I will make a package called lunch_options.
Folder structure
First, let’s make a folder called lunch_options for the project.
Then, make another folder in lunch_options also called lunch_options e.g. lunch_options/lunch_options.
Your project structure will now look like this (/ indicates a folder):
lunch_options/
└──lunch_options/
I will refer to
- the top folder as the project folder, and
- the bottom folder as the source code folder,
throughout the post.
Create virtual environment (optional)
This is optional but recommended. Making a virtual environment creates a safe package development environment that avoids many dependency issues down the road.
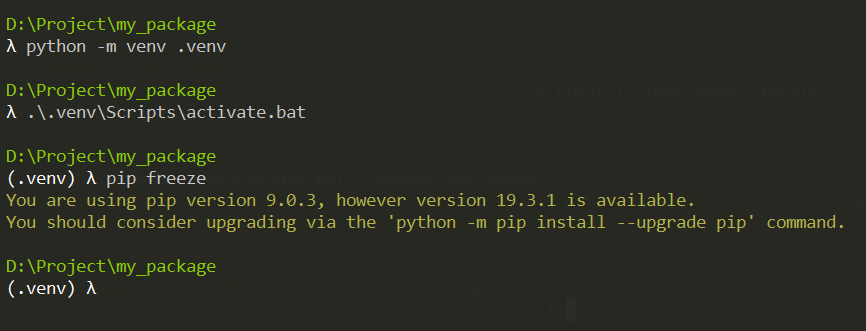
Open up your command line or Terminal and go to the project (top) folder.
In the top folder, type the following: (if your python points to python2, then use python3 in place of python)
# In lunch_options/
python -m venv .venv
This creates a folder that hosts the virtual environment inside lunch_options/.venv, so your project now looks like
lunch_options/
├──.venv/
└──lunch_options/
with no file other than the ones in .venv.
Then, activate the virtual environment:
# Windows
.\.venv\Scripts\activate.bat

# Unix
source .venv/bin/activate

# type "deactivate" to deactivate the virtual env
After activating the virtual environment, type pip freeze to check that there is no package installed—it should return nothing.
Add code
There are two things we need as code:
lunch_options/lunch_options/__init__.pylunch_options/setup.py
Create them as empty files in the respective folders.
lunch_options/
├──setup.py
├──.venv/
├──lunch_options/
|  └──__init__.py
__init__.py
The double underscore init (often called “dunder init”) is a special file for Python interpreter to know that the code in here can be imported when installed.
For now, let’s leave it empty.
setup.py
The template I like to use for setup.py is modified from the minimal structure from the Python packaging guide
the lines I commented out are optional. You can skip or put them back them if it is for internal use.
from setuptools import setup

setup(name='lunch_options',
      version='0.1',
      # description='The funniest joke in the world',
      # url='http://github.com/storborg/funniest',
      # author='Flying Circus',
      # author_email='flyingcircus@example.com',
      # license='MIT',
      packages=['lunch_options'],
      # zip_safe=False
)
In other words, you only need name, version, and packages.
from setuptools import setup

setup(name='lunch_options',
      version='0.1',
      packages=['lunch_options'],
)
Note on the packages argument
The packages part is a list that takes in all the modules and submodules you want to install.
A lot of people use find_packages() from setup_tools (link to docs) to avoid manually putting all the paths and subpaths into a list.
Here we have only one subfolder below setup.py so there is only one item in the list.
Install the package
Having both __init__.py and setup.py, the package is ready to be installed.
We will use an editable install of the package for development.
Make sure that you have activated the virtual environment .venv.
In the project folder where setup.py is, run
pip install -e .
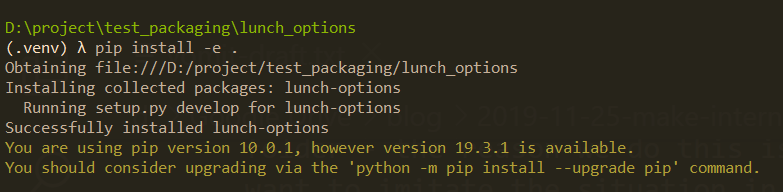
The -e option tells pip to run an editable install. It doesn’t make a copy of the code into the Python interpreter folder. Instead, it makes reference to the code that we are editing, so any change we make will show up whenever we reload Python.
This is useful because when developing package, you want to make changes and not having to run pip install each time after change.
Test your installation
Now, while still in the virtual environment, run
pip freeze
You should see

Start the Python REPL with python, and type
import lunch_options
It should import with no errors:

Congratulations! You have created a Python package.
Next, let’s go deeper and put functions into the package.
2. How to structure the project
Most of the time, our code has more than one file. In this section, I’ll experiment with a few ways of structuring a project.
First, navigate to a different location that is not your project folder, say D:\ on Windows or ~ on Mac.
The reason we do this is we want to imitate the situation in deployment where your working directory is likely not your project directory.
Our current project structure looks like this
lunch_options/
├──setup.py
├──.venv/
├──lunch_options/
|  └──__init__.py
and we will modify it to organize the functions better.
Step 1. Put function in __init__.py
The special file __init__.py holds all the “top-level” imports. What it means is that anything written in there is loaded when you type the import lunch_options statement.
Let’s add this to our __init__.py:
def food():
    print('Burrito')
Exit the Python REPL by typing exit()
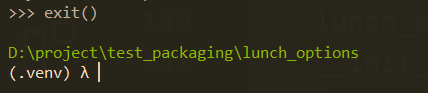
and enter the REPL again with python.
There are multiple ways we can call food().
>>> import lunch_options
>>> lunch_options.food()
Burrito
>>> from lunch_options import food
>>> food()
Burrito
If you package is small, you can totally put all the code in __init__.py. For example, pyperclip has only one file in its source code folder.
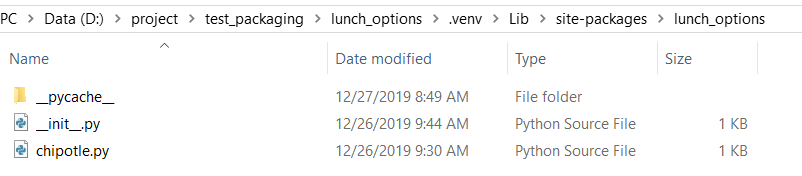
Step 2. Multiple files in the folder
Let’s add two more files into our project, chipotle.py and wendys.py
lunch_options/
├──setup.py
├──.venv/
├──lunch_options/
|  ├──__init__.py
|  ├──chipotle.py
|  └──wendys.py
with
# chipotle.py
def food():
    print('Sofritas')
and
# wendys.py
def food():
    print('Baconator')
Now (remember to restart the REPL) we can call wendys.food() with
>>> from lunch_options.wendys import food
>>> food()
Baconator
This pose a problem though: in our chipotle.py, we also have food(), so importing food() cause a collision in namespace.
Instead, we can do this:
>>> import lunch_options.wendys
>>> lunch_options.wendys.food()
Baconator
A common problem in Step 2
One problem many people had was this: what if I just import lunch_options and try to call wendys.food() from there?
You get an error:
>>> import lunch_options
>>> lunch_options.wendys.food()
Traceback (most recent call last):
  File "<stdin>", line 1, in <module>
AttributeError: module 'lunch_options' has no attribute 'wendys'
To fix this, go to __init__.py and add on the first line
# __init__.py
import lunch_options.wendys

# ...
and now it works
>>> import lunch_options
>>> lunch_options.wendys.food()
Baconator
The issue is that whatever is not in __init__.py is not run during import lunch_options. In the namespace after the import, lunch_options.wendys is missing, which cased the error, so adding it to __init__.py fixed it.
Raise functions to the top in __init__.py
You can also add new alias of the functions we defined in __init__.py. For example,
# __init__.py
from lunch_options.wendys import food as wendys_food
and now you can call it directly:
>>> import lunch_options
>>> lunch_options.wendys_food()
Baconator
Step 3. Subfolders
What about the subfolders? **This one is tricky because editable install has a different behavior than normal install`. I’ll explain.
Let’s change the project structure to the following.
lunch_options/
├──setup.py
├──.venv/
├──lunch_options/
|  ├──__init__.py
|  ├──chipotle.py
|  └──fastfood/
|     ├──wendys.py
|     └──mcdonalds.py
Inside mcdonalds.py I have
# mcdonalds.py
def food():
    print('McRib')
Let’s try using this function. Here I often hear people asking a question.
Common question: why can’t I import?
To test this behavior:
- Uninstall your package with
pip uninstall lunch_options - Install again, this time avoid
-eand just usepip install .in the folder wheresetup.pyis.
Now import becomes tricky: all three fails
>>> import lunch_options.fastfood
Traceback (most recent call last):
  File "<stdin>", line 1, in <module>
ModuleNotFoundError: No module named 'lunch_options.fastfood'

>>> import lunch_options.fastfood.mcdonalds
Traceback (most recent call last):
  File "<stdin>", line 1, in <module>
ModuleNotFoundError: No module named 'lunch_options.fastfood'

>>> from lunch_options.fastfood.mcdonalds import food
Traceback (most recent call last):
  File "<stdin>", line 1, in <module>
ModuleNotFoundError: No module named 'lunch_options.fastfood'
Why does my import fail with subfolders?
When you run a normal pip install, Python setuptools make a copy of your package to where the Python interpreter is. What’s in there?
The fastfood folder is missing!
The reason is because in our packages argument inside setup.py only has lunch_options,
# setup.py that fails to import fastfood

from setuptools import setup

setup(name='lunch_options',
      version='0.1',
      packages=['lunch_options'],
)
so it does not look deeper and find fastfood. How can I fix this?
Fixing setup.py for subfolders
To fix this, we need to add fastfood as part of the package:
# setup.py that works
from setuptools import setup

setup(name='lunch_options',
      version='0.1',
      packages=[
          'lunch_options',
          'lunch_options.fastfood'
      ],
)
with this new setup.py, when we run pip install ., it correctly moves fastfood into site-packages:

Thehe reason why you see people use setuptools.find_packages() in the package=find_packages() is because once your project grows large, it makes more sense to recursively walk through the project structure than adding the folders one by one.
Let’s try importing again
>>> import lunch_options.fastfood.mcdonalds
>>> lunch_options.fastfood.mcdonalds.food()
McRib
>>> from lunch_options.fastfood.mcdonalds import food
>>> food()
McRib
>>>
As you can see, we still need to import mcdonalds in the chain to get to mcdonalds.food()—this is by design. Both of these fails:
>>> import lunch_options
>>> lunch_options.fastfood.mcdonalds.food()
Traceback (most recent call last):
  File "<stdin>", line 1, in <module>
AttributeError: module 'lunch_options' has no attribute 'fastfood'

>>> import lunch_options.fastfood
>>> lunch_options.fastfood.mcdonalds.food()
Traceback (most recent call last):
  File "<stdin>", line 1, in <module>
AttributeError: module 'lunch_options.fastfood' has no attribute 'mcdonalds'
Now you know how to organize your project into a Python package and import the code!
3. How to install from remote repository
After you packaged your code and put it on an internal repository, you may want to test if you can install from the source code in said repository.
This way, you can host your code there and let the colleagues install directly from source and bypass setting up a PyPI server.
To install from a remote repositroy, you can run strings like this
pip install git+https://github.com/changhsinlee/python-packaging-tutorial.git
or to install from a particular branch in this case mcchicken:
pip install git+https://github.com/changhsinlee/python-packaging-tutorial.gi t@mcchicken
Your turn
In this tutorial, I showed you
- How to make a Python package
- How to structure the project
- How to install from remote repository
Let’s turn your Python code into packages and share with others.